Miter Saw Station Plan to fit Rolling Tool Chest

Intro to Plan
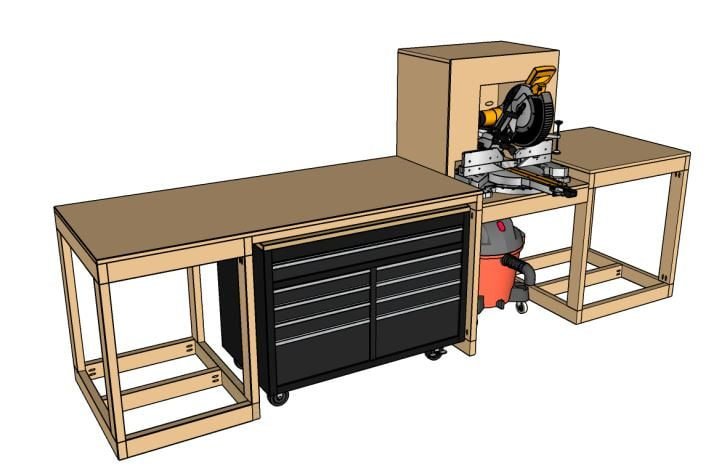
One of the most important additions to my shop has been this miter saw station. It has made quick cuts simple and quick.
If there is ever a repetitive cut or a mitered corner that needs to be cut, this little station makes it a whole easier.
This design helped me store my rolling tool chest without taking up more space in my shop. My tool chest is 48" x 20" x 37" and on the original casters, it was just a little too tall to fit under the station top.
Once I removed the factory 5" casters and added heavy-duty 3" casters, it cleared the surface no problem and slid right into place. The tool chest easily rolls out and while in place, makes it very easy to access my hand tools.
Also, I was thinking that I might add a vacuum port under the dust collection box to attach the shop vacuum to help mitigate the dust in the shop.
This little was designed to be added to over the years as my needs change. I am thinking of adding a T-track stop block system on the work surface to make repetitive cuts easier, I have added an air compressor compartment on the left side and I also plan to some large drawers on the right side.
The possibilities are endless.

Disclaimer
This workbench was designed to fit the DeWalt 12 in Double Bevel Sliding Compound Miter Saw, Model DWS716. If you have a different miter saw than shown above, this station can easily be modified to fit your needs.
The Miter Saw base is 30" x 30" and will easily fit any size miter saw on the market, but the height will need to be adjusted to make sure the top of the station sits flush with the cut surface of your saw.
Please double-check your saw's dimensions and measurements and make sure that it will fit.
Each element of this build was geared toward my personal preference but can be easily adjusted to fit your personal taste and needs. I HIGHLY suggest that you look through the entire build plan and make your personal notes and adjustments before beginning.
As the old saying goes, "Measure Twice, Cut Once."
The material list is minimal and this project is meant for a beginner builder. As for tools, basic shop tools and joinery are used for this build.
You can find a more in-depth list of tools & hardware on the "Master Materials List" page. I always suggest that you precut your lumber and plyboard so that you are able to sit and concentrate on assembling the final build all at once.
Disclaimer: All projects performed following instructions found on this site are done at your own risk. Learn more
Master Materials List

Tools
Note: As an Amazon Associate, I earn from qualifying purchases.
HARDWARE / FASTENERS
- 2-1/2" POCKET HOLE SCREWS (x100)
- 1-1/4" POCKET HOLE SCREWS (x25)
- 3" GENERAL PURPOSE WOOD SCREWS (x25)
- 2" GENERAL PURPOSE WOOD SCREWS (x10)
- 18 GAUGE BRAD NAILER (x1)
- 1" - 18 GAUGE BRAD NAILS (x25)
Master Cut List
2 x 4 - 8' Doug Fir Std / White Board (x14) - A - B - C - D

4' x 8' x 3/4" Black Melamine (x2) - E - F - G

4' x 8' x 3/4" Particle Board (x1) - H - I - J

4' x 8' x 3/8" Black MDF (x1) - K

*** I ALWAYS SUGGEST THAT YOU CUT YOUR MATERIAL BEFORE MOVING FORWARD TO THE NEXT STEP. ENSURING YOU HAVE THE CORRECT AMOUNT OF MATERIAL WILL KEEP THE ANGER TO A MORE MODERATE LEVEL. EXTRA MATERIAL IS ALWAYS A GOOD IDEA TOO! ***
Building instructions
STEP 1: DRILLING POCKET HOLES

FIRST, MAKE THE NECESSARY CUTS LISTED ON THE "MASTER MATERIALS LIST" PAGE GRAB THE QUANTITES OF 2x4s LISTED ABOVE IN LENGTHS OF 50", 30" & 24" ON ONE SIDE, AT EACH END OF THE 2x4s, DRILL 2 POCKET HOLES USING A POCKET HOLE JIG AND POWER DRILL
STEP 2: ASSEMBLING BRACE FRAMES

- USING 2-1/2" POCKET HOLE SCREWS, ATTACH THE FLAT SIDES OF THE 2x4s, PARTS (A) & (C) TOGETHER
- REPEAT THIS PROCESS 5 TIMES
STEP 3: BUILDING LEFT SIDE BOX

- USING 2-1/2" POCKET HOLE SCREWS, ATTACH THE OUTER FACES OF THE 6 PIECES OF PART (B) TO 2 OF THE BRACE FRAME ASSEMBLIES
- FACE THE POCKET HOLES TOWARDS THE INSIDE OF THE BOX FOR A CLEANER LOOK
STEP 4: BUILDING RIGHT SIDE BOX

- USING 2-1/2" POCKET HOLE SCREWS, ATTACH THE OUTER FACES OF THE 6 PIECES OF PART (A) TO 2 OF THE BRACE FRAME ASSEMBLIES
- FACE THE POCKET HOLES TOWARDS THE INSIDE OF THE BOX FOR A CLEANER LOOK
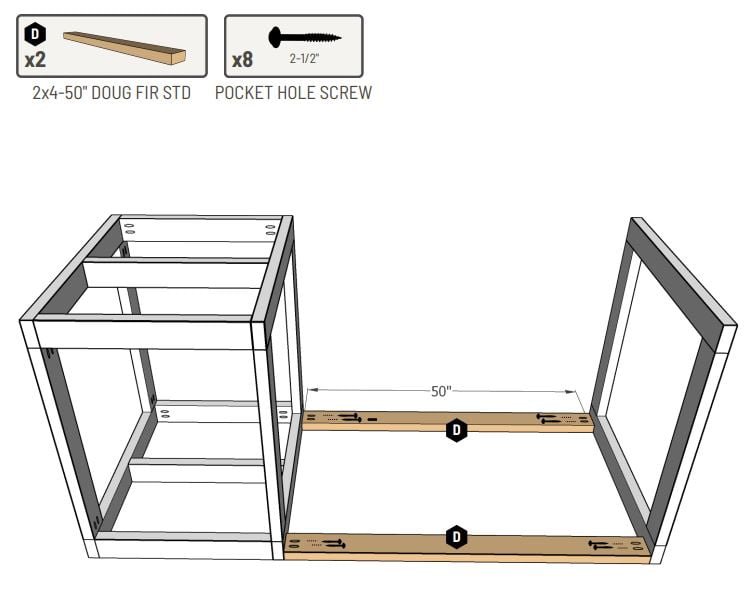
STEP 5: ATTACHING TOOL CHEST CROSS BRACES

- ATTACH THE 2 PIECES OF PART (D) TO A BRACE FRAME AND THE LEFT SIDE BOX
- LINE UP THE OUTER EDGE OF THE BRACES WITH THE OUTER EDGE OF PART (D)
TIP: IT'S EASIEST TO ATTACH PARTS (D) TO THE BRACE FRAME AND LEFT SIDE BOX WITH THE PARTS FLAT ON THE GROUND AND THEN FLIP THE ASSEMBLY RIGHT SIDE UP
STEP 6: ASSEMBLING SAW BASE BRACE

CREATE A BOX WITH 4 PIECES OF PART (A)
STEP 7: ATTACHING SAW BASE FRAME

- ATTACH THE SAW BASE FRAME TO THE 2 MAIN ASSEMBLIES AS SHOWN ABOVE
- WHEN LINING UP YOUR SAW BASE FRAME, USING CLAMPS AS STOPS AND A RUBBER MALLET WILL HELP YOU MAKE MINOR ADJUSTMENTS UNTIL IT IS IN PLACE
- USE 3" WOOD SCREWS TO SECURE THE SAW BASE TO THE FRAMES
TIP: THESE NEXT STEP ONLY APPLIES TO THE DEWALT DWS716 MITRE SAW. THE SAW BASE FRAME IS 3" FROM THE TOP OF MAIN FRAME
STEP 8: ATTACHING COUNTER TOPS

- USE THE POCKET HOLE JIG AND DRILL POCKET HOLES FACING UPWARD ON INSIDE OF THE ASSEMBLY TO MOUNT THE MELAMINE TOPS, (E, F & G)
- USE 1-1/4" POCKET HOLE SCREWS TO ATTACH THE MELAMINE TOPS IN PLACE
- USE 2" WOOD SCEWS TO ATTACH PART (E) TO THE BRACES ABOVE THE TOOL CHEST
STEP 9: DUST COLLECTION BOX

- USE THE POCKET HOLE JIG AND DRILL POCKET HOLES ON THE BACK (I) PART OF THE DUST COLLECTION BOX AS SHOWN ABOVE
- USE 1-1/4" POCKET HOLE SCREWS TO ATTACH THE DUST COLLECTION SIDES (H) TO THE BACK (I)
STEP 10: DUST COLLECTION BOX CONT.

- USE THE POCKET HOLE JIG AND DRILL POCKET HOLES ON THE BACK (I) PART OF THE DUST COLLECTION BOX AND ON EACH SIDE (H) AS SHOWN ABOVE
- USE 1-1/4" POCKET HOLE SCREWS TO ATTACH THE DUST COLLECTION TOP (J) TO THE SIDES (H) AND BACK (I)
TIP: ASSEMBLING THESE PARTS UPSIDE DOWN IS MUCH EASIER
STEP 11: DUST COLLECTION BOX FACE

- CUT THE FACE SLIP OUT OF THE 28" x 30" x 3/8" MDF (K) USING THE DIMENSIONS LISTED ABOVE
- ATTACH THE FACE (K) TO THE DUST COLLECTION BOX USING THE BRAD NAILER [*YOU CAN ALSO SCREW THE FACE IN PLACE IF YOU DO NOT HAVE A BRAD NAILER*]
- PLACE DUST COLLECTION BOX ASSEMBLY ON THE SAW BASE PLATFORM
STEP 12: SETTING UP THE STATION

SETTING THE MITER STATION IN PLACE
Only thing left to do is to do it.
We suggest that you set up your station along a wall that has plenty of power outlets, but make sure that you are not covering any once that station is in place.
Push the station up against the wall
Place the fully assembled dust hood on the miter saw base and push it back against the wall. It should be heavy enough that you won't have to secure it, but you can use screws to secure it to the station coss braces.
