How to Build a Patio Bench and Coffee Table
Note: All projects performed following instructions found on this site are done at your own risk. Learn more
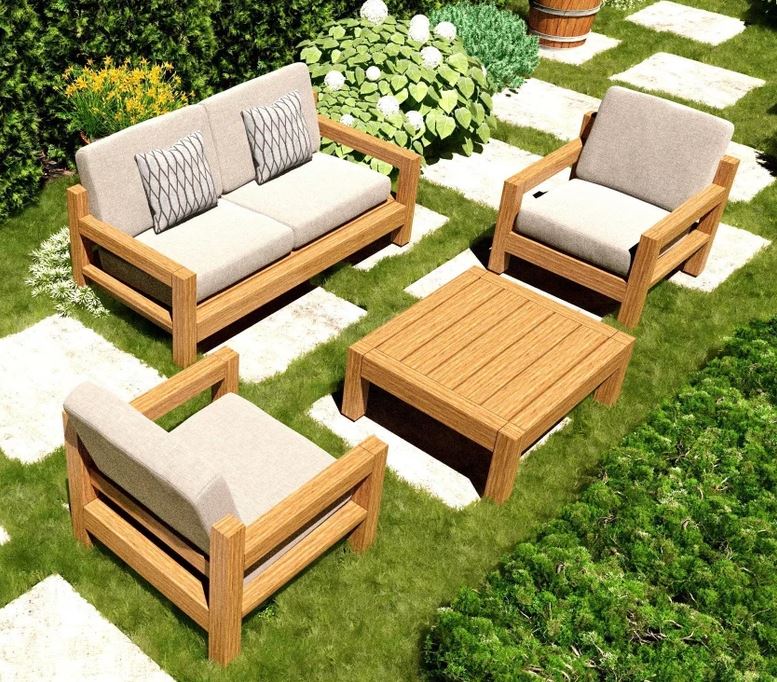
First of all, the construction of this patio bench and coffee table is quite simple.
It has a style that suits your farmhouse or the village you live in.
In terms of durability, the screws we will use will overcome this.
Building a patio bench and coffee table can be both fun and budget-friendly.
Read on for the plans and steps for how to make a patio bench and coffee table.
You will patio bench and coffee table plans, dimensions, details, and instructions here.
Review them carefully so you will be ready when it’s time to cut and organize the pieces.
The patio bench and coffee table building process starts with (single patio) legs and side supports.
Hardwood or pressure-treated boards are a popular choice, as are cedar and cypress.
Pressure-treated timber is easy to stain, durable, and budget-friendly.
1) Starts by checking the list of tools to use for your DIY patio bench and coffee table. After collecting the missing tools, focus on purchasing materials.
2) Measure and cut all the pieces and prepare them. Measure the length twice before doing your cuts. Make sure to label each one.
Tips: Drill pilot holes in wood pieces using a power drill for easy connections.
3) Follow the Project details for assembling the wood pieces.
4) We will use 2 1/2" and 5" Screws.
5) You will secure use wood glue to the contact surface.
6) Fill any gaps and frame nail holes with wood putty.
7) Sand the entire Project with 150-220 grit or more sandpaper and dust pf before painting or staining your finished Project.
Cut List:
Single Tall Patio
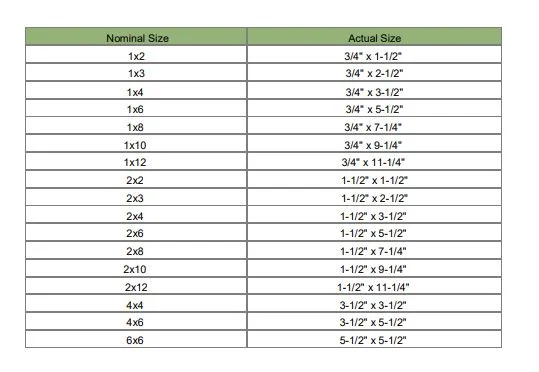
A1 - 2 – 4 x 4 x 30″ long feet 5'
B1 - 2 – 4 x 4 x 24″ small feet 4'
C1 - 2 – 4 x 4 x 30″ upper joint between feet 5'
D1 - 4 – 2 x 4 x 30″ lower joint between feet 10'
E1 - 4 - 2 x 4 x 72″ right and left junction middle supports 24'
F1 - 5 - 2 x 6 x 72″ top boards 30'
G1- 2 - 2 x 4 x 72'' back joint parts 12'
Total: 2x4x46' , 2x6x30' , 4x4x14'
Double Patios
A1 - 2 – 4 x 4 x 30″ long feet 5'
B1 - 2 – 4 x 4 x 24″ small feet 4'
C1 - 2 – 4 x 4 x 30″ upper joint between feet 5'
D1 - 6 – 2 x 4 x 30″ four-sided inter-leg joints 15'
H1 - 5 - 2 x 6 x 30″ top boards 12'6''
H1 - 2 - 2 x 4 x 30'' back joint parts 5'
Total: (2x4x20') x 2 , (2x6x12' 6'') x 2 , (4x4x14') x 2
Coffee Table
K1 - 4 – 4 x 4 x 16 1/2″ feet 5' 6''
L1 - 2 – 2 x 4 x 30″ upper right and left joints between legs 5'
M1 - 2 – 2 x 4 x 30″ right and left 2nd joint between legs 5'
P1 - 2 – 2 x 4 x 36″ upper anterior and posterior junctions between legs 6'
N1 - 2 – 2 x 4 x 36″ front and back 2nd junction between legs 6'
R1 - 5 - 2 x 6 x 36'' top boards 15'
Total: 2x4x22' , 2x6x15', 4x4x5' 6
Total piece to be taken:
2x4x88' , 2x6x57' 6'' , 4x4x24' 6''
Recommended Tool List:
- Tape measure
- Saw - Drill
- Countersink drill bit
- Wood glue
- 2 1/2", and 5" Screw.
- Sanding
Stain/preferred paint coating:
- Water-Based Pre-Stain Wood Conditioner
- Water-Based Wood Stain mixed: Desert Sand and Pure White
- Water-Based polyacrylic
Note: As an Amazon Associate, I earn from qualifying purchases.
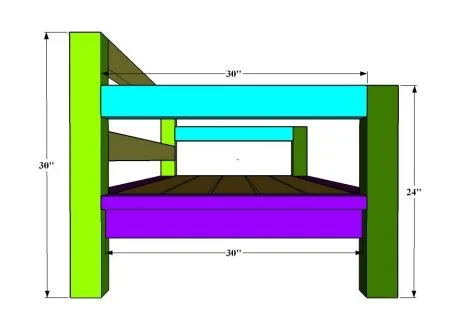
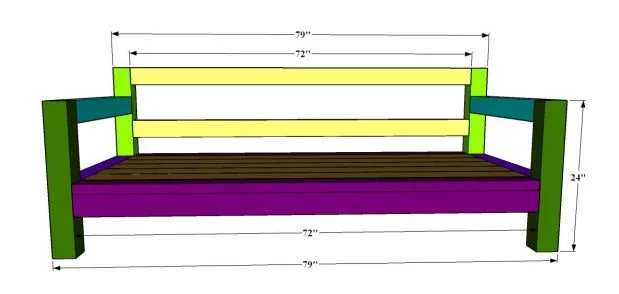
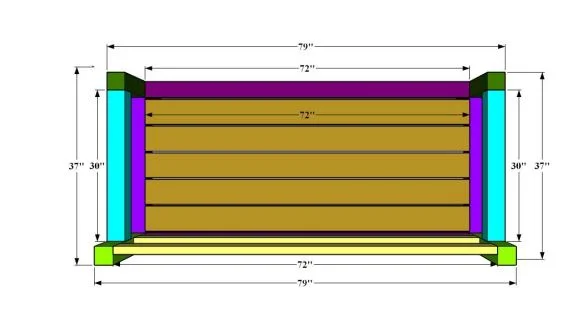
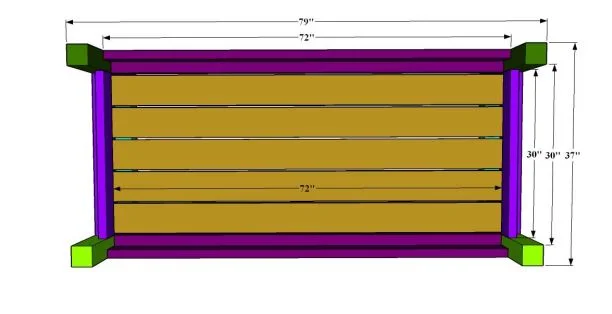
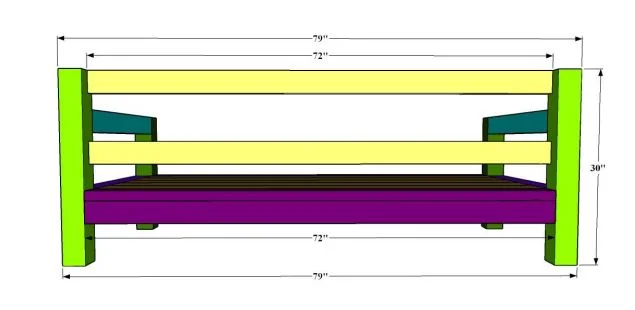
Single Tall Patio General Dimensions
Side View:
Front View:
Top View:
Bottom View:
Back View:
Notes:
It will be easier to stain the patio bench and coffee table before you finish assembling the patio bench and coffee table.
First, sand the wood with 150 grit or higher sandpaper to achieve a smooth, even surface before staining.
Thoroughly remove all dust from the wood by using a vacuum with a hose attachment, then wipe clean with a damp cloth. then wiping clean with a damp cloth.
First, apply Pre-Stain Wood Conditioner to the patio bench and coffee table boards.
Apply the Pre-Stain Wood Conditioner and allow it to penetrate the wood for just 1-5 minutes, then remove excess conditioner that has not soaked into the wood with a clean rag Apply Water Based Wood Stain to all of the wood.
What I love about the water-based stain is
1) how easy clean-up is…
2) how little odor the stain has…
3) the colors.
You can get everything from bold, colorful shades to neutral wood tones to light, creamy cottage and ocean-inspired stains.
Apply the stain using a foam brush, and allow it to penetrate the wood no longer than 3 minutes.
It is very fast-drying, so work in small sections! Wipe the wood with a clean cloth to remove any stain that has not soaked into the wood.
Allow the stain to dry 24 hours before applying a protective finish.
Tip: It will be easier to wear a pair of gloves while wiping the excess stain to keep our hands clean than to wash our hands.
After the stain has dried for 24 hours, apply a thin coat of Water Based Polyacrylic (I used the clear matte finish) using a brush.
Allow to dry at least 2 hours, then sand with a very fine 220 grit sandpaper and remove all dust.
Apply a second and third coat, drying and sanding in between each layer.
The wood will need 3 hours to dry before handling and 24 hours before it will be fully cured.
If you've ever used polyurethane on top of white paint and seen the yellow stains that appeared once the poly dried, you know how important it is to make sure you're using the right topcoat.
* If you wish, you can create different beautiful results with your own color choices.
I prefer to use these colors mostly for coffee tables. But beautiful colors will look good anywhere.
Assembly Process(Single Tall Patio):
Step 1:
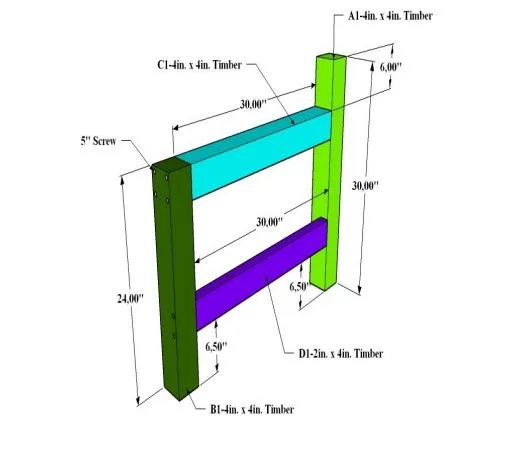
First, we measure and mark a distance of 6 1/2'' from the bottom inner part of the B1 short leg upwards.
Then we stick the D1 piece on the spot we marked and wait for it to dry.
After the glue dries, we screw it from the outside of the B1 foot, from the level of the D1 part, so that it coincides with the lower and upper parts.
Now we glue and screw the C1 piece so that it coincides with the top of the B1 foot.
Then, after making sure that the B1 foot is on a flat surface, we stick the long A1 foot to the ends of the C1 and D1 parts and screw it from the outside.
The distance from the top of the A1 leg to the C1 piece will be 6 inches.
The distance from the bottom of the A1 leg to the D1 piece will be 6 1/2 inches.
If you wish, you can do it by following the steps in order, starting from the A1 leg first.
You can choose whichever of the two is easier for you.
When making the tall single patio table we will only use 2 1/2" screws while screwing the top E1 pieces to the other E1 pieces underneath.
We use 5'' screws everywhere else.
Step 2:
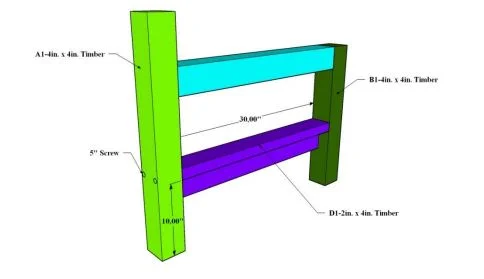
Now, just above the D1 piece, we turn the other D1 piece, which has the same dimensions, on its side, stick it between the feet and screw it from the outside of the feet.
If you want, you can also do this after screwing the C1 and D1 parts to the B1 foot in the first stage.
In order not to have a problem in screwing the E1 parts that we will place in the 4th step, we need to screw the D1 part in a way that it coincides with the lower or upper level, not from the middle part.
We will screw the E1 parts in the opposite direction of these screws.
Step 3:
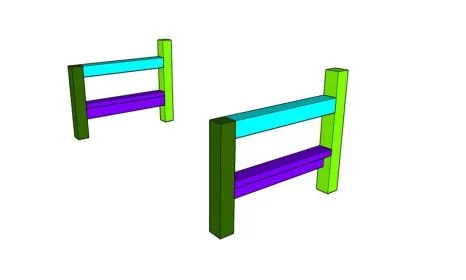
We have completed the joining parts of one side. Now we repeat these operations once again to use on the other side and prepare the feet of the other side.
When placing the D1 middle support piece between the feet, we need to pay attention to the inside of the foot.
Step 4:
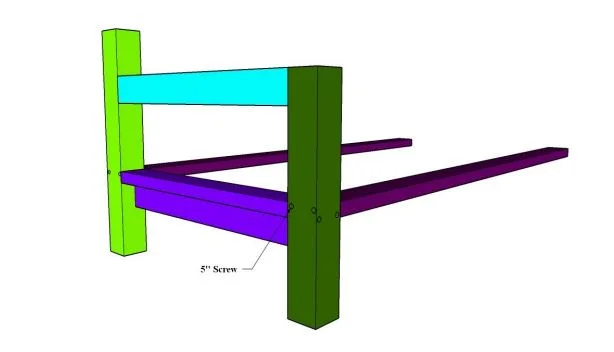
Now we glue two pieces of E1 to the inside of the feet A1 and B1 so that they line up with the horizontal piece D1 above.
Here, it will make your job easier to put the ends of the E1 parts on any item or floor at a height of 10 inches.
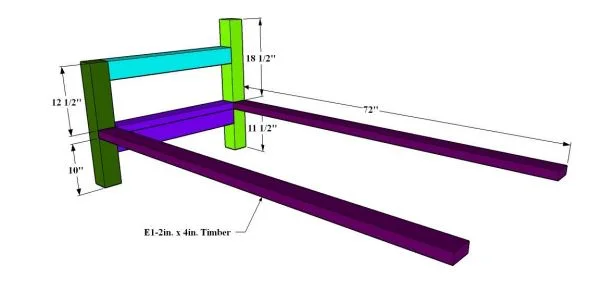
When screwing the E1 parts, according to the screwing in the 2nd stage, we need to screw it from the top if it is below, and from the bottom side if it is above.
Step 5:
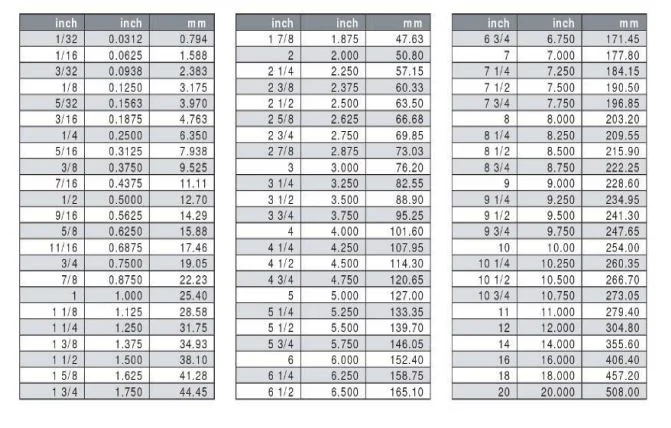
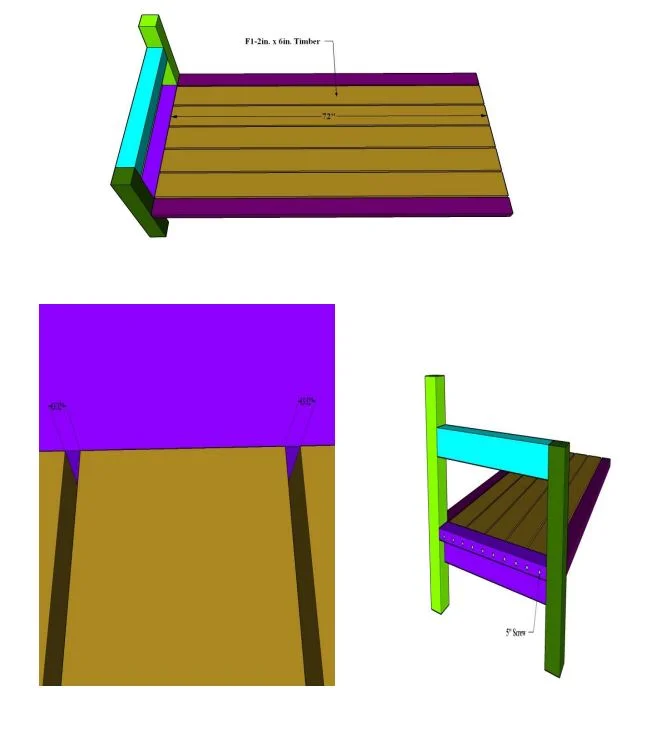
Now, starting from the right or left side, we place and paste the F1 top boards with 13/32'' (0.41inc) space between them.
Again, putting the ends on a different item or floor that will provide 11 1/2'' height from the ground will make it easier for us.
After the F1 parts dry and stick together strongly, we screw the F1 parts from the outside of the D1 part.
It will be more robust if we screw the screws to the right and left of the F1 part, two pieces each.
Step 6:
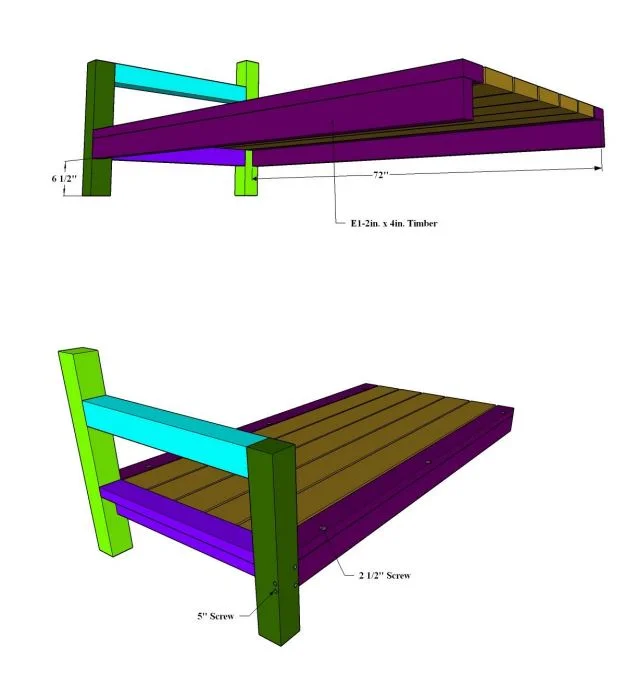
Now, we stick the other 2 pieces of E1 to the right and left sides of the E1 pieces we placed first, as in the picture, and to the A1 and B1 legs.
We also glue these two pieces to the E1 pieces that we placed first.
We do the screwing of the lower E1 parts from the outside of the B1 foot, close to each other in the middle, in accordance with our screwing type.
It would also be better if we screw the lower E1 parts from the upper parts to make it more robust.
Step 7:
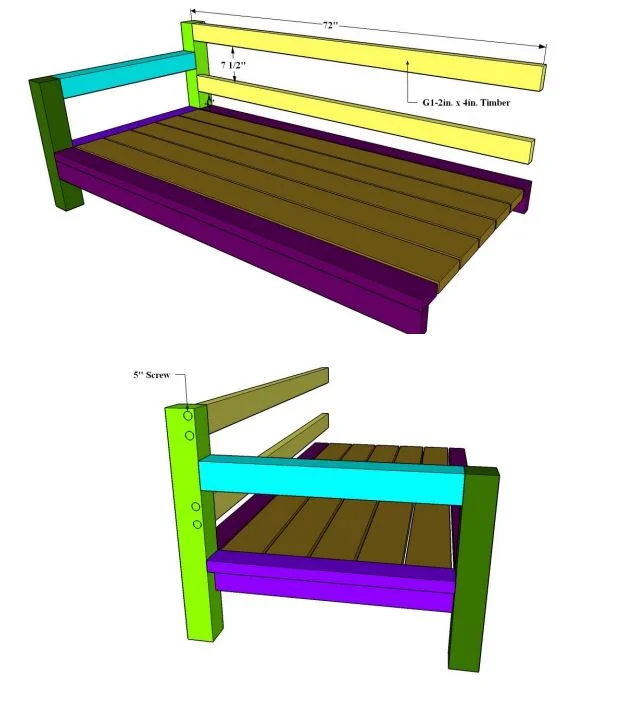
Now we place and glue the G1 piece so that it coincides with the upper inner part of the A1 foot.
After the wood glue dries, we make 2 screws from the outside of the A1 foot at the level of the G1 piece, from the bottom and top.
You can add the 3rd screw to the middle part for more stability.
To place the second G1 piece, we measure and mark 4 inches upwards from the upper E1 piece and glue the other G1 piece just above it.
We do the screwing process in the same way 2 or 3 pieces.
Step 8:
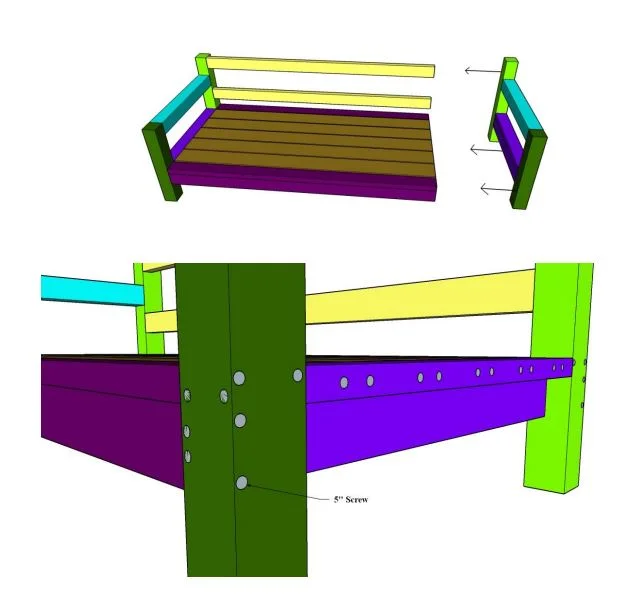
Now, we glue and screw the opposite feet, which we completed in the first stage, on the ends of the pieces E1, F1, and G1.
Here, when we place the A1 and B1 feet in a way that they exactly coincide with the E1 pieces on the right and left, the other pieces will be in harmony.
Legs A1 and B1 must be 10 inches above the ground for correct alignment. When combining and gluing, you should pay attention to the fact that the system is on a flat surface.
We need to do the screwing operations correctly to prevent the screws from touching each other as shown in the picture.
We make the screws of the lower E1 part from the up and down sides, and the screws of the lower D1 part close to each other in the middle.
We adjust and screw the screws of the upper F1 and D1 parts in the opposite direction to each other.
We do the screwing of the G1 top boards as in the picture, 2 or 3 pieces per piece.
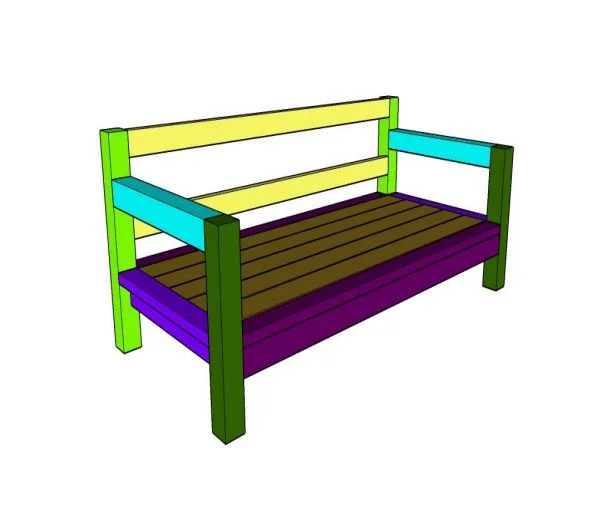
Thus, we complete our single tall patio seating bench!
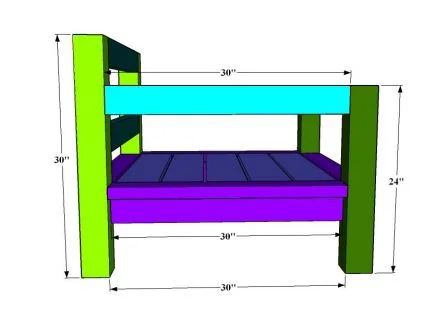
Double Patios General Dimensions
Side View:
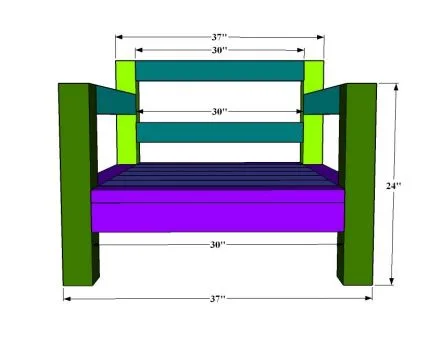
Front View:
Top View:
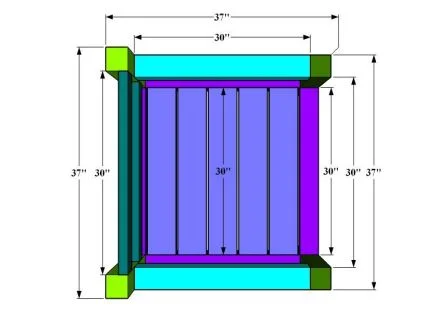
Bottom View:
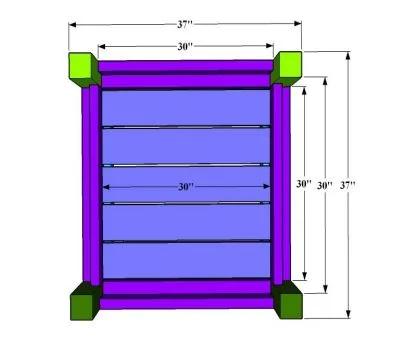
Back View:
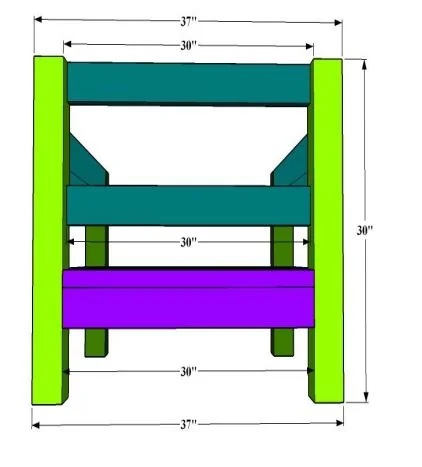
Assembly Process(Double Patios)
Step 1:
When making this double patio bench, many parts will be done with the same processes as the long patio bench.
Only the dimensions of the middle panels are different.
The dimensions of the feet and joints on the right and left are the same.
Since this patio bench will consist of two parts, you can proceed by making two pieces each for easier operations.
If you wish, you can also build it as a single piece according to your needs.
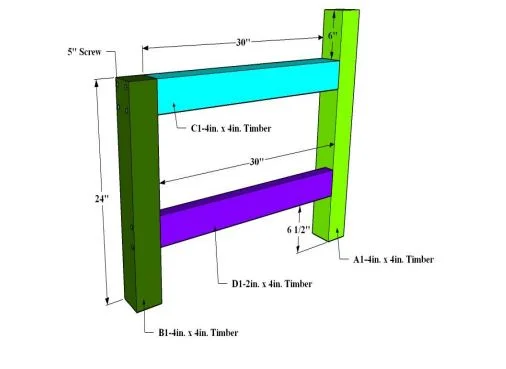
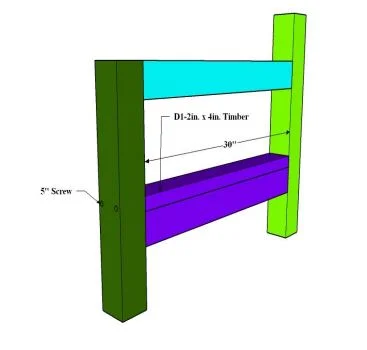
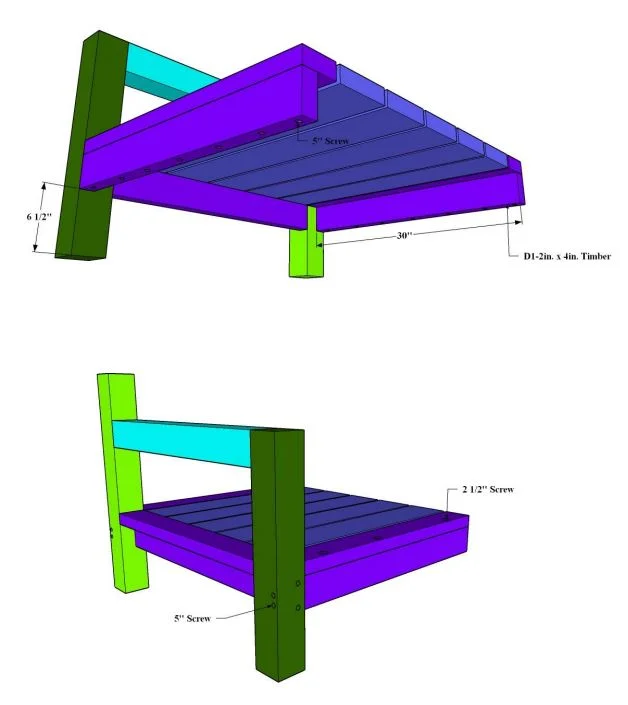
First, we measure and mark a distance of 6 1/2'' from the bottom inner part of the B1 short leg upwards.
Then we stick the D1 piece on the spot we marked and wait for it to dry.
After the glue dries, we screw it from the outside of the B1 foot, from the level of the D1 part, so that it coincides with the lower and upper parts.
Now we glue and screw the C1 piece so that it coincides with the top of the B1 foot.
Then, after making sure that the B1 foot is on a flat surface, we stick the long A1 foot to the ends of the C1 and D1 parts and screw it from the outside.
The distance from the top of the A1 leg to the C1 piece will be 6 inches.
The distance from the bottom of the A1 leg to the D1 piece will be 6 1/2 inches.
If you wish, you can do it by following the steps in order, starting from the A1 leg first.
You can choose whichever of the two is easier for you.
Step 2:
Now, just above the D1 piece, we turn the other D1 piece, which has the same dimensions, on its side, stick it between the feet and screw it from the outside of the feet.
If you want, you can also do this after screwing the C1 and D1 parts to the B1 foot in the first stage.
In order not to have a problem in screwing the E1 parts that we will place in the 4th step, we need to screw the D1 part in a way that it coincides with the lower or upper level, not from the middle part.
We will screw the E1 parts in the opposite direction of these screws.
Step 3:
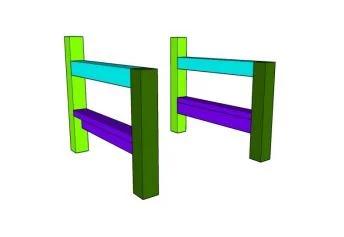
We have completed the joining parts of one side.
Now we repeat these operations once again to use on the other side and prepare the feet of the other side.
When placing the D1 middle support piece between the feet, we need to pay attention to the inside of the foot
Step 4:
Now we glue two pieces of D1 to the inside of the feet A1 and B1 so that they line up with the piece D1(horizontal) above.
Here, it will make your job easier to put the ends of the D1 parts on any item or floor at a height of 10 inches.
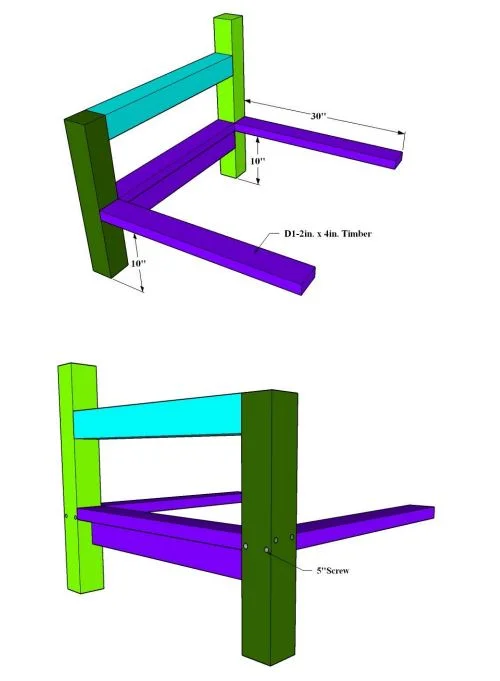
When screwing the D1 parts, according to the screwing in the 2nd stage, we need to screw it from the top if it is below, and from the bottom side if it is above.
Step 5:
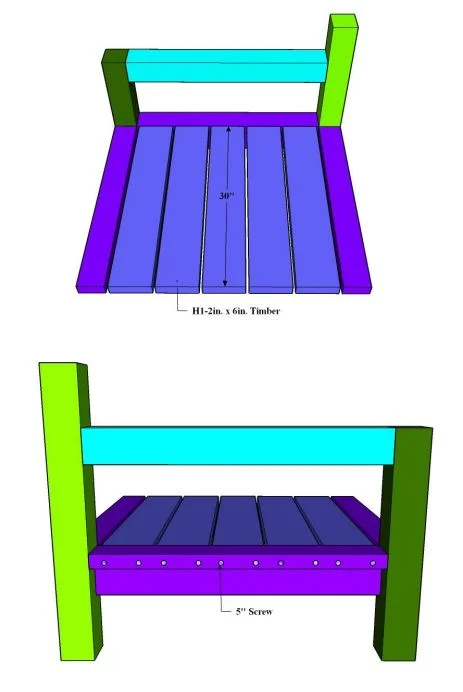
Now, starting from the right or left side, we place and paste the H1 top boards with 13/32'' (0.41inc) space between them.
Again, putting the ends on a different item or floor that will provide 11 1/2'' height from the ground will make it easier for us.
After the H1 parts dry and stick together strongly, we screw the D1(new) parts from the outside of the D1(first) part.
It will be more robust if we screw the screws to the right and left of the H1 part, two pieces each.
Step 6:
Now, we stick the other 2 pieces of D1(bottom) to the right and left sides of the D1(top) pieces we placed first, as in the picture, and to the A1 and B1 legs.
We also glue these two pieces to the D1(top) pieces that we placed first.
We do the screwing of the lower D1 parts from the outside of the B1 and A1 feet, close to each other in the middle, in accordance with our screwing type.
It would also be better if we screw the lower D1 parts from the upper parts to make them more robust.
Step 7:
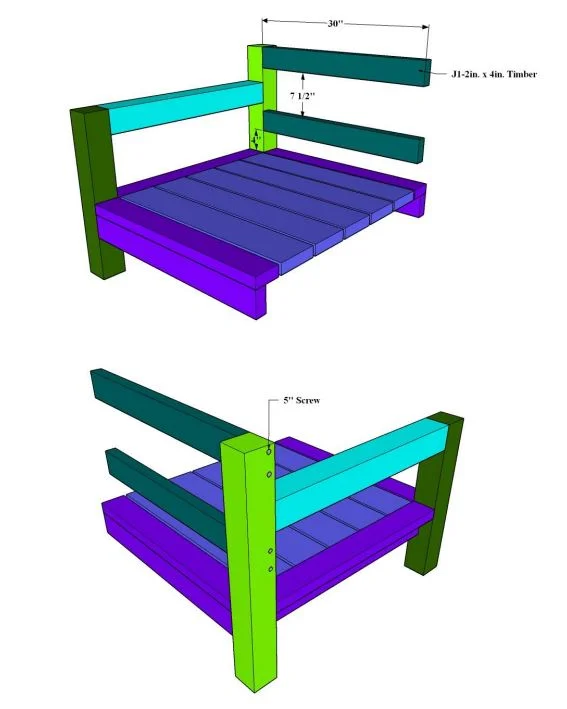
Now we place and glue the J1 piece so that it coincides with the upper inner part of the A1 foot.
After the wood glue dries, we make 2 screws from the outside of the A1 foot at the level of the J1 piece, from the bottom and top.
You can add the 3rd screw to the middle part for more stability.
To place the second J1 piece, we measure and mark 4 inches upwards from the upper D1 piece and glue the other J1 piece just above it.
We do the screwing process in the same way 2 or 3 pieces.
Step 8:
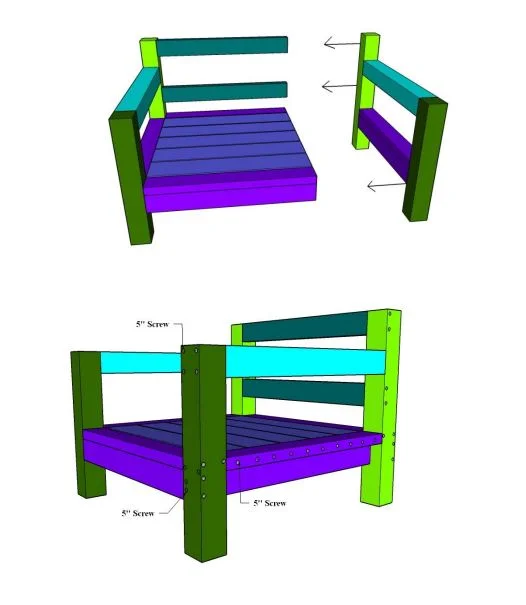
Now, we glue and screw the opposite feet, which we completed in the first stage, on the ends of the pieces D1, H1, and J1.
Here, when we place the A1 and B1 feet in a way that they exactly coincide with the D1 pieces on the right and left, the other pieces will be in harmony.
Legs A1 and B1 must be 10 inches above the ground for correct alignment.
When combining and gluing, you should pay attention to the fact that the system is on a flat surface.
We need to do the screwing operations correctly to prevent the screws from touching each other as shown in the picture.
We make the screws of the lower D1 part from the up and downsides, and the screws of the lower D1 part close to each other in the middle.
We adjust and screw the screws of the upper D1(right) and D1(left) parts in the opposite direction to each other.
We do the screwing of the H1 top boards as in the picture, 2 or 3 pieces per piece.
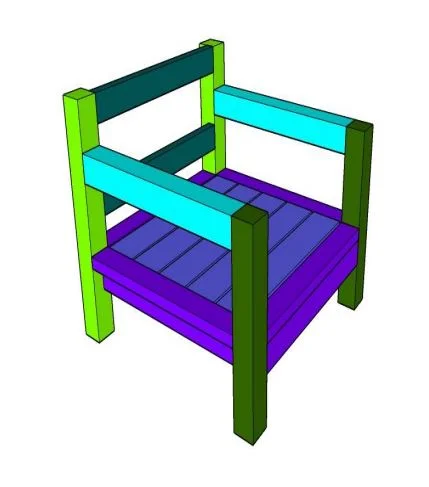
Thus, we complete our double patios seating bench!
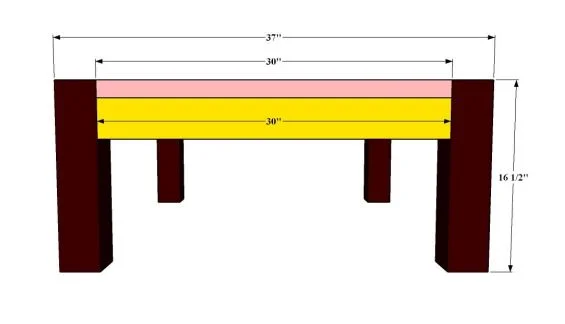
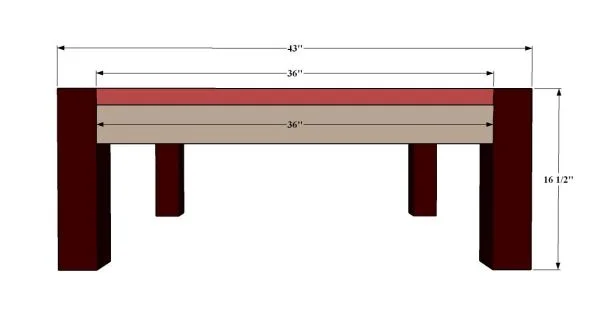
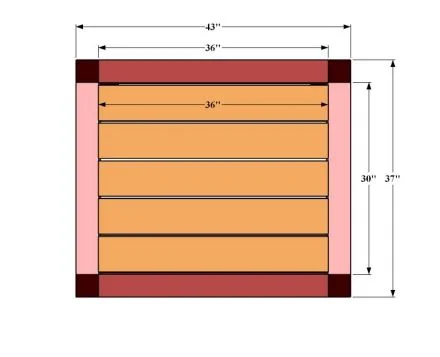
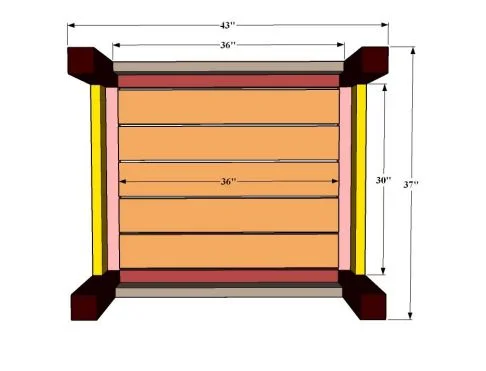
Coffee Table General Dimensions
Side View:
Front View:
Top View:
Bottom View:
Assembly Process(Coffee Table)
Step 1:
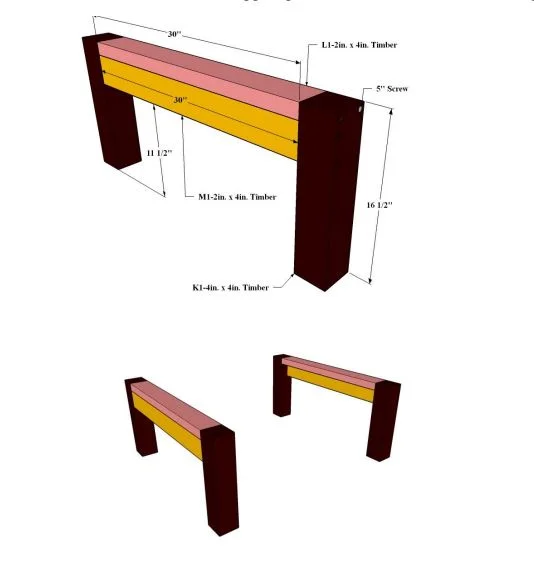
First, we glue the L1 middle support piece, as in the picture, so that it exactly coincides with the upper inner part of the K1 foot.
After it dries, we make 2 screws on the outer right and left sides of the K1 foot.
We use 5'' screws. In the next step, it is necessary to screw the screws of the L1 part slightly down or slightly up so that we do not have problems when screwing the P1 side support part.
We do this screwing in the same way for the M1 part.
Now we place the M1 part on the lower outer part of the L1 part as in the figure and paste it on both K1 and L1 parts.
Then we screw the M1 part from the outward side of the K1 foot so that it coincides with the lower and upper points.
We repeat these operations one more time to use on the opposite side and we prepare the other legs.
Here, we should pay attention to the fact that the M1 middle support part comes to the inside of the K1 legs.
Step 2:
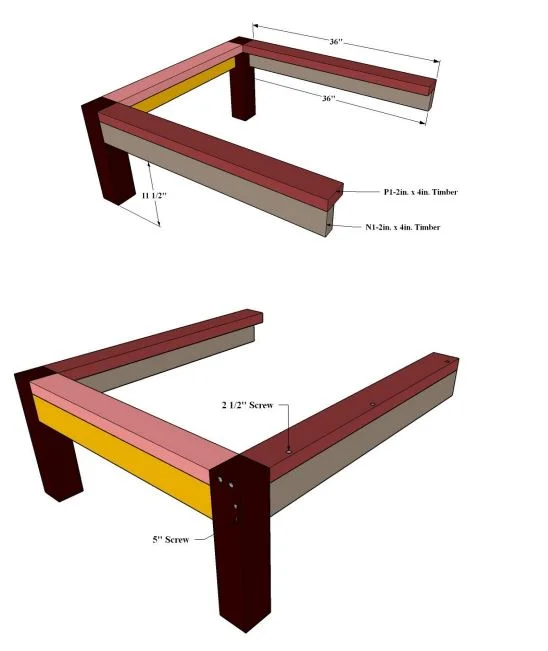
Now, we stick the P1 side support pieces as shown below so that they exactly coincide with the upper side of the K1 legs.
After the wood glue dries, we screw it from the outside of the K1 feet.
We need to screw the L1 part a little down or up in the opposite direction of the direction we screwed.
Then we place the N1 lower side support piece so that it coincides with the outer and lower part of the P1 piece and glue it to both the K1 piece and the P1 piece.
We adjust the screwing of the N1 part according to the type of screwing in the previous stage, and we make it either from the middle part close to each other or from the lower and upper parts.
Step 3:
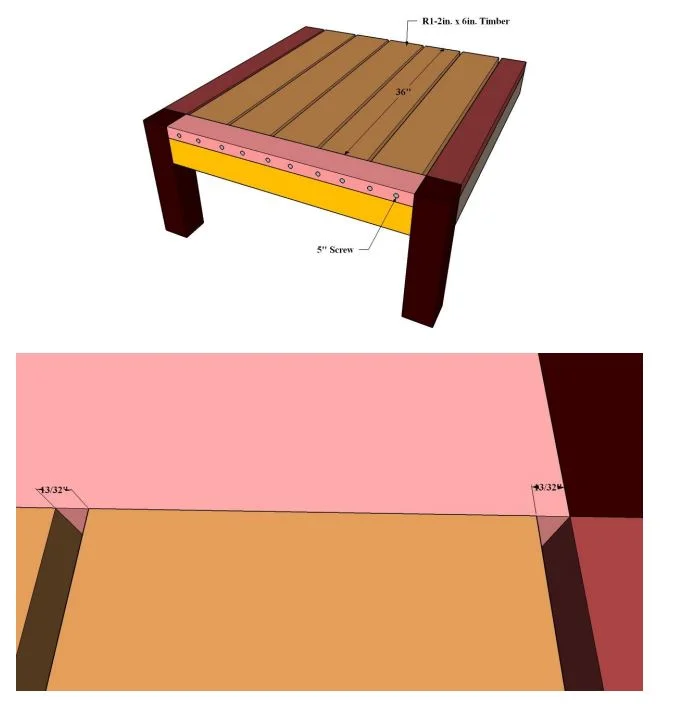
Now, we stick the R1 top boards to the L1 piece starting from the right or left comb with a 13/32'' (0.41inch) gap between them and screw them from the outside after it dries.
You can make 3 screws to be more solid.
Step 4:
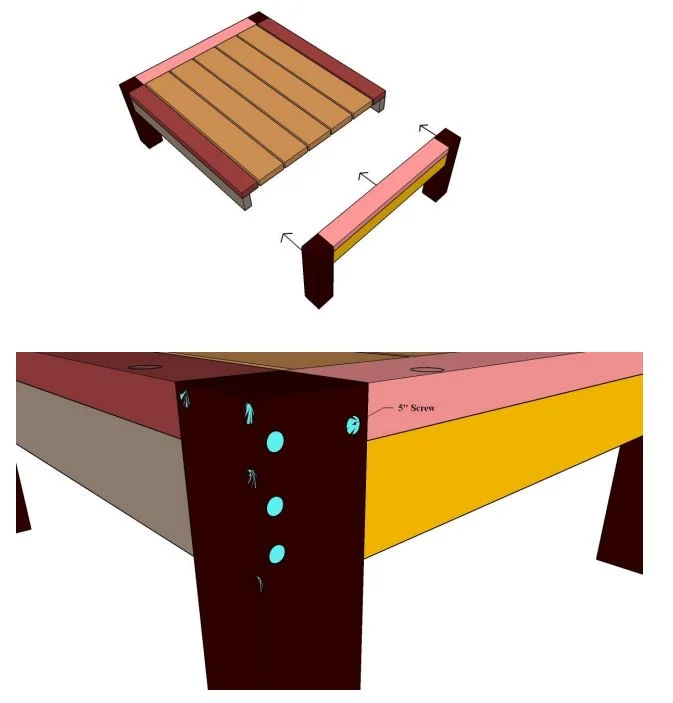
Now we glue the opposite legs that we made in the 1st stage to the ends of these joints.
It will be easier to do this on a flat surface.
As seen in the picture below, we need to adjust the screwing operations so that they do not touch each other.
Since our area is large, this will not be a problem.
Because we use 2x4 timbers for even the smallest double screwing area.
Step 5:
After combining the opposite legs and completing their screwing, we can make it more solid by screwing the upper parts of our coffee table if you want.
We used 5'' normal screws for all screwing operations.
For screwing from the top, 2 1/2'' screws will be sufficient.
After all the screwing processes are completed, we can fill the screw holes to make our coffee table look more beautiful.
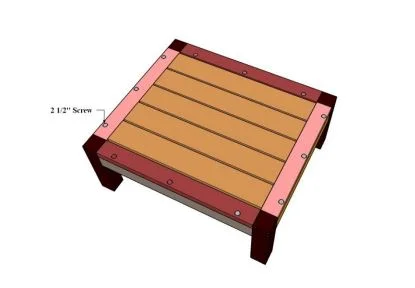
Thus, we complete our coffee table!
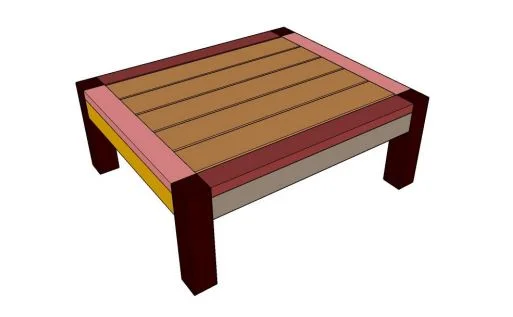


This patio furniture set not only will make plenty of rustic charm to your backyard and outdoors depending on your design preferences but also, will look modern, minimalistic, warm, and relaxing in your farmhouses.
You can create a more perfect space that offers comfortable seating for parties, barbecues, and get-togethers at home.
You can better enjoy your backyard space all year round and be inspired by the changes of the seasons.
