How to Build a Basic Miter Saw Station

Note: All projects performed following instructions found on this site are done at your own risk. Learn more
The dimensions shown for this workbench and its components are designed for a minimum workspace of 180”L x 24”W x 38”H.
These dimensions can be altered to accommodate your specific needs.
All dimensions are in standard measurements (inches).

Materials List
Wood
- 2”x4”x8’ Lumber (18)
- 1”x2”x10’ Lumber (4)
- 3/4” Plywood (4)
Hardware (approximate)
- 2.5” Construction Screws (130)
- 1.25” Construction Screws (100)
- 2.5” Pocket Screws (80)
- 1.25” Pocket Screws (55)
- 1.5” Brad Nails (100)
Other
- Wood Glue
- T-Track 13ft
- Leveling Feet 8
- Right to Left adhesive Measuring Tape 10ft
- Left to Right Adhesive Measuring Tape 8ft
TOOLS
Note: As an Amazon Associate, I earn from qualifying purchases.
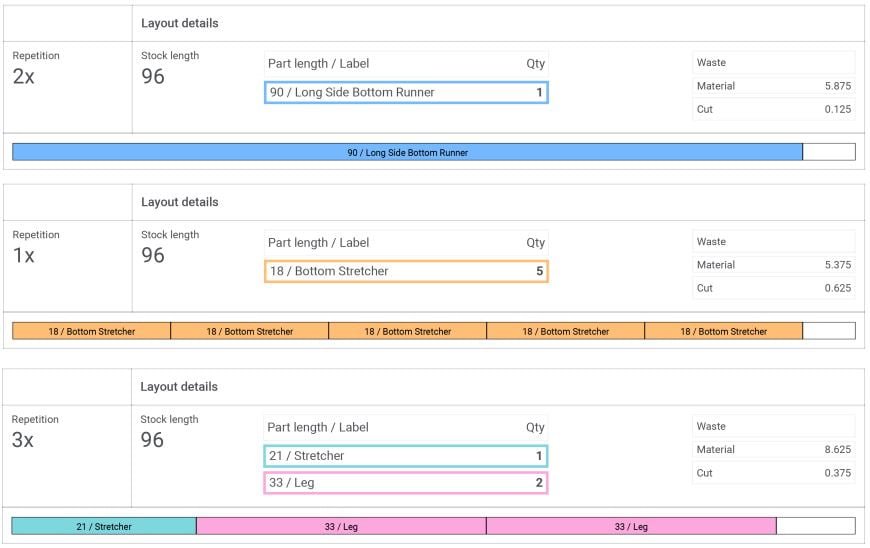
CUT SHEETS - 2x4s

CUT SHEETS - 2x4s

CUT SHEETS - 2x4s

CUT SHEETS - 3/4 PLYWOOD

CUT SHEETS - 3/4 PLYWOOD

CUT SHEETS - 3/4 PLYWOOD

FRAME ASSEMBLY - 1
Assemble Legs (x8)
The leg assembly is made up of (2) 33” 2x4s laminated together at a 3.5” offset.

Glue and Screw
1. Mark one of the boards with a line 3.5” from one end.
2. Then align the 2 boards as shown using the line as a reference and glue together using wood glue.
3. Re-enforce with 2.5in wood screws as shown.
*Note: The side without screws will face outward on your workbench so that no screws will be visible.
4. Wipe off excess glue and repeat the process for all 8 leg assemblies

FRAME ASSEMBLY - 2
Prep Stretchers
Prepare the stretchers for the top and bottom frame assemblies by drilling (2) pocket holes in each end.
Repeat this step for (11) 21” and (5) 18” stretchers. (All 4 pocket holes should be on the same face of the board.)

*NOTE: This step is optional, if you don’t mind exposed screws you can skip the pocket holes.
Prep Sides of Bottom Frame Assembly
Prepare the long sides of the bottom frame assemblies by drilling (2) pocket holes in each end of both the (2) 90” and (2) 54” boards. (All 4 pocket holes should be on the same face of the board.)

FRAME ASSEMBLY - 3
Assemble Top and Bottom Frames
1. Lay out the frame components on a flat surface as shown below with the stretchers evenly spaced (Approx. 24” On Center).
2. Use a speed square or other 90 degree tool to ensure the stretchers are square to the sides.
Using 2.5” pocket screws, fasten the stretchers to the sides making sure the pocket holes are not visible from the outside of the frame.
3. Repeat these steps for both top and bottom assemblies.
(Using clamps to hold the assembly in place is helpful while screwing everything together)


*NOTE: Notice the orientation of the end pieces is different on the bottom frames than on the top frames.
This is to create a stronger joint once the legs are put on and will make more sense in the following steps
FRAME ASSEMBLY - 4
Attach Workbench Legs To Top and Bottom
Attach Legs
1. With the TOP frame on a flat surface, lay out the legs as shown below. Ensure the legs are straight and square.
2. Using (4-5) 2.5” Wood Screws fasten each leg to the Top from the inside of the assembly.
3. Repeat this step for both the long and short sides of the Miter Station.
(Legs should be oriented so the screws holding the leg assembly together are facing the inside of the workbench)

Attach The Bottom
1. With the bench still upside down, set the Bottom frame into place on the legs. It should sit inside the offset “ledge” on the legs. Align it so that it is flush on the ends and everything is square.
2. Fasten the Bottom frame to the legs as shown using (4) 2.5” wood screws each. Repeat this step for both the long and short sides of the miter station.
3. The screws that are visible from the outside face should be countersunk and covered with wood filler.

FRAME ASSEMBLY - 5
Assemble Saw Platform and Complete Frame Assembly
Assemble Saw Platform
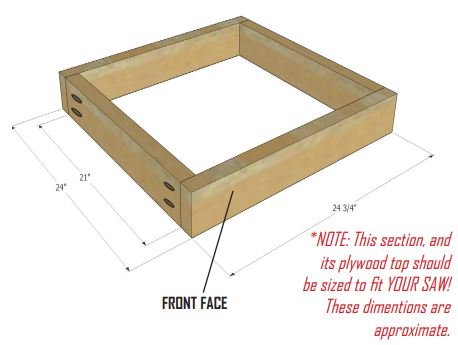
1. Lay out the saw platform components on a flat surface as shown below.
2. Fasten using 2.5” pocket screws.
(A “band clamp” can be helpful when assembling this small frame)

Attach Saw Platform Between The 2 Workbenches
1. Flip the 2 assembled workbenches upright and move them into place leaving space for the saw platform in between.
Attach the saw platform as shown below using 2.5” wood screws.
The saw platform will mount just under the top frame of the workbench, 3.5” below the top surface.
Be sure the front face of the saw platform is flush with the front of the workbenches.
(You can use spacers or clamps to hold the platform in place while attaching)
2. Using Pocket screws, attach a brace between the workbenches near the bottom of the back legs (See Below)

FRAME ASSEMBLY - 6
Frame Assembly Complete
Sanding & Prepping for Plywood Tops
1. Sand thoroughly! Be sure that the top of the frame is completely flat and flush, this will be important when we add the plywood tops. (Sand away any excess wood glue or wood filler.)
2. Drill (2) Pocket Holes between each stretcher on the inside face of the TOP frames.
Then drill (1-2) pocket holes in the middle of each stretcher. (These holes will be used later to attach the plywood top, orient them accordingly)
3. Install leveling feet on all legs per manufacture instructions.

Bench Top Assembly - 1
Laminating the Bench Tops
Apply Wood Glue
The bench tops will be made up of 2 pieces of plywood laminated together.
1. Lay your top plywood sheet “good side” down on the frame.
2. Apply an even layer of wood glue spread throughout the entire sheet. (A trowel or small scrap piece of wood works well for spreading the glue)

*NOTE: This upside down sheet will be the top of your bench, so use the best sheet you have, with the “good side” down in this step.
Glue and Screw
1. Carefully lay your second sheet of the same size on top and line up the edges as flush as you can.
2. Clamp the two sheets together
3. Measure and mark the approximate location of T-Track.
4. Screw the sheets together using several 1.25” wood screws evenly spaced along the edges and middle of the sheets making sure you do not put any screws near the path of the T-Track.
5. Wipe off any excess glue.
6. Repeat this process for both sides of the miter station and the middle saw platform.

Bench Top Assembly - 2
Attach The Bench Top
1. Flip the bench top over so that the “good side” is facing up and align it the best you can making sure the edges are flush with frame. Then clamp it down.
(Be sure the area without screws that you marked for your T-Track is oriented correctly)
2. Using 1.25” pocket screws, fasten the top to the frame from underneath through the pocket holes you drilled earlier.
3. Repeat this process for both sides of the miter station and the middle saw platform.

Flush Trim The Edges
1. Using a flush trim bit in your router, trim the edges of the bench top so the 2 sheets of plywood are perfectly flush with each other.
(If you don’t have a router, this can be done with a circular saw and straight edge, or by sanding)
2. Repeat this for all bench top edges.

Bench Top Assembly - 3
Attach Edge Banding
1. Rough cut 1”x2” boards slightly longer than the sides of your bench top.
(These will be trimmed to size after they are attached)
2. Apply a thin layer of wood glue to one side and align them flush with the top surface of the bench top.
3. Fasten them to the edge of the bench top using brad nails.
4. Trim off excess edge banding with fine tooth hand saw.

Trim / Fill Holes / Sand
1. Fill nail holes with wood filler. Then after its dried, sand away any excess wood filler.
2. Using a round-over bit in your router, round over the edges of the edge banding.
(If you don’t have a router, this can be done by sanding)
3. Sand the entire top smooth.
4. Repeat for all top surfaces.

Finishing & T-Track - 1
Measure and Mark for T-Track
1. Position your miter saw on middle the saw platform.
2. Using a straight edge, square and tape measure, align the miter saw so the fence is perfectly parallel with the front of the workbench.
3. Holding your straight edge against the fence, mark the location of your Track on both sides. Extend your mark down the length of the workbench. Then remove the saw.

Routing For T-Track
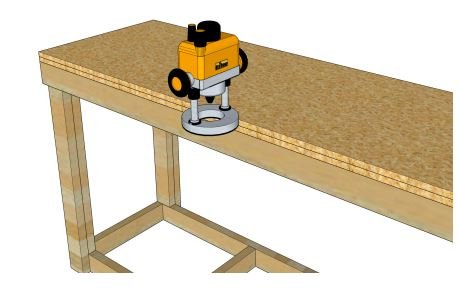
1. Install a 3/4” straight bit in your router (Adjust if your T-Track is a different size than standard 3/4”). Then measure the distance from the bit to the edge of your router base.
2. Using that measurement, clamp a straight edge exactly that distance above the line you drew for your T-Track.
3. Set the depth on your router to slightly lower than the height of the T-Track
4. Run your router down the straight edge, routing out a grove the length of the workbench.
5. Test fit the T-Track, make adjustments if necessary, then repeat this process for both sides of the miter station.

*NOTE: Placing painters tape over the line to be routed can help prevent splintering of the plywood. And glueing a sacrificial board on the ends can help prevent “tear-out”
Finishing & T-Track - 2
Apply Finish
1. Sand your bench top and edge banding with fine grit sand paper.
2. Remove all loose debris from the surface.
3. Using a good quality brush or foam brush, apply a thin layer of finish to the surface of the bench top and edge banding.
4. After the first coat has dried, sand lightly with a fine grit sand paper, then apply another thin coat. Continue that process until you have applied your desired number of coats.
(Follow the manufacturers instructions for dry times and applying multiple coats.)

Install T-Track
1. After your finish has dried thoroughly, insert your T-Track into the groove you routed out in the previous steps.
2. Cut T-Track to length if necessary using your miter saw.
3. Use 3/4” wood screws to fasten your T-Track to the bench top.
(Some T-Track may not come with pre-drilled holes. If necessary, pre-drill and countersink the mounting holes evenly spaced across the length of the track before inserting screws.)

Install Bottom Shelf
Notch and Fasten Bottom Shelf to Frame
1. Using a Jig Saw, cut out a 1.5”x3.5” notch from the corners of the Bottom Shelf as shown below.
2. Place bottom shelf into place on the frame and fasten with wood screws at least 1.5” long.
3. Repeat this process for the bottom shelf on both sides of the miter station.
(This can also be secured using pocket screws from underneath if you wish)

Align Miter Saw
Aligning and Securing Miter Saw
1. Place Miter Saw back onto the miter station.
2. Using a straight edge, square and tape measure, align the miter saw so the fence is perfectly parallel with the front of the workbench and lined up with the T-Track.
3. If Necessary, use shims to raise the Miter Saw bed so that it is flush or slightly above the surface of the bench top. (Paying cards work well as shims for this step.)
4. Once your Saw is perfectly aligned and shimmed to the correct height, if you wish to mount your saw to the bench semi-permanently; use washers and the appropriate length screws to fasten the saw base to the bench top through the factory mounting holes.

Congratulations!!
Enjoy your new Miter Saw Station.


